
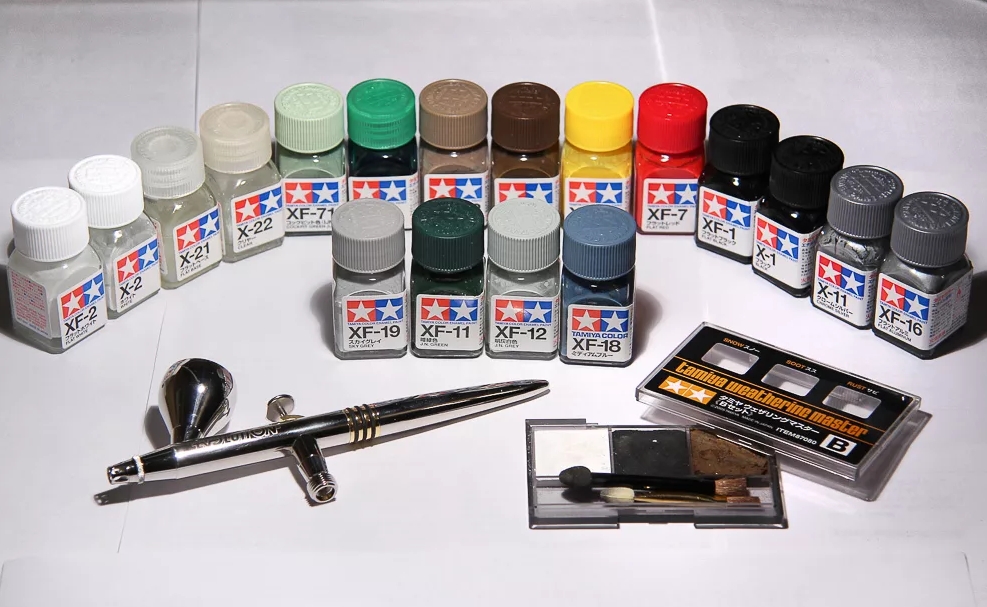
How to Thin Acrylic Paint for an Airbrush When Painting Miniatures
Painting miniatures with acrylics is a lot of fun. It’s also a great way to spend time and create new pieces for your collection, but what if you are looking to thin the paint so that it can be used in an airbrush? Acrylic paint can become too thick when painting small details or working on large surfaces, which makes it difficult for the paint to flow through an airbrush without clogging. We will go over how to thin acrylic paints for use with an airbrush below!
Why you should paint miniatures with acrylics
When it comes to miniatures, there are a lot of different materials and techniques that can be used. Acrylics offer the advantage of being available at any art store or craft store in an assortment of colors. They also dry quickly which means you can work with them more than oils for example! This article will explore how to thin acrylic paint so that it is useable in your airbrush — whether you want a wetter look on small details or if you’re painting large surfaces like terrain pieces.
Airbrushing: Airbrushes have become very popular over the last few years as they provide artists with another tool in their arsenal. It allows for finer control and better results when using water-based paints because unlike spraying from a can, the paint is atomized to a finer mist. It also leaves less overspray and has more control over your painting surface.
- Do not use too much water or thinner in relation to paint; this will cause the mixture to be runny and difficult to work with as it flows through the airbrush. Generally speaking, try adding about five parts water/thinner per one part acrylic paint when thinning paints for use with an airbrush — but always do what works best for you!
- Use short bursts of pressure from the trigger rather than holding down continuously so that there isn’t any chance of clogging the airbrush
- Give the paint a chance to dry before adding more layers, especially if you are using an acrylic and not watercolor. Acrylics will need at least 24 hours for it to cure completely in order to prevent any runs or sagging in your work!
Paint Thinning: When thinning paints for use with an airbrush there is no one set ratio that works for everyone. Some people prefer their paint thinner than others so experiment until you find what works best for you! This article focuses on how to thin acrylic paints specifically which have been sealed with varnish. The following steps should be taken when painting miniatures with acrylics:
- Add a few drops of either distilled water or matte medium to the paint. We recommend working in small amounts so that you can see what is going to happen — too much water could lead to a splotchy appearance or, if thinned too heavily, may not be useable with an airbrush!
- Mix well with your acrylic paints and wait twenty four hours for it to dry before testing again
- If you are still having trouble getting the right consistency after adding more drops of distilled water or matte medium then try using white spirit as this will thin paints faster but also dries them completely quicker.
Bullet points: Acrylics offer advantages over oils because they dry quickly; however, when painting miniatures thinner than 24hrs might cause problems Add a few drops of distilled water or matte medium to the paint and mix well White spirit can be used to thin acrylic paint faster. Additionally I recommend to read the detailed article I suggest you read the detailed post How to Thin Acrylic Paint for an Airbrush When Painting Miniatures.
What materials you need to paint miniatures with acrylics
Before you start painting with acrylics, make sure that your paint is completely dry. Acrylic paints can take up to 24 hours for it to cure so if you try painting too early the risk of sagging or runs are much higher! This article focuses on how to thin acrylic paint for use with an airbrush — but other techniques exist as well!
If you want a wetter look and don’t need an even coat across all surfaces then water-based colors are perfect; however, when using them in your air brush be cautious because this introduces some issues due to their properties. First of all, most water based paints will not work at all through an airbrush unless they have been thinned heavily which could lead to splotches and an uneven coat. Secondly, when a water-based paint is thinned too much it will start to act like a very watered down acrylic which means that you may be able to see the brushstrokes easily in your work even after drying!
Painting a miniature step-by-step
To paint a miniature, follow these steps:
- Prime the figure with white primer. The primer is used to fill in any unwanted color on your miniature and create a clean canvas for you to work with. If necessary, use an airbrush or paint brush (depending on what you are trying to achieve) to spread the prime over the miniature.
- Paint the figure with a base color, such as blue or green. Use an airbrush or paint brush to spread this color over the entire piece of your model and let it dry completely before continuing on to another step in painting.
- Paint the figure with a shade color. This is typically darker than your base color, but it can be lighter if you are trying to achieve an effect that has orange or purple hues in addition to blue or green. Use an airbrush (or paint brush) and let dry completely before continuing on to another step of painting.
- Paint highlights onto any pieces of the miniature where light would naturally hit, such as around joints or edges where two colors meet. For this step we recommend using brushes for greater accuracy when painting detail work and more control over how much paint will go into each area; use an airbrush if you want even coverage throughout the piece without highlighting certain areas too intensely while leaving others blank. Let the piece dry before switching colors.
- Switch to a lighter shade color if you want to add any more details that are not being highlighted, such as the eyes or other features; this can be done with an airbrush (or paint brush). Let it dry completely before moving on.
- Add highlights onto these small areas of the miniature and let it dry before painting another set of highlights over these new smaller ones in order to create gradients from lightest at one edge to darkest near joints or edges where two colors meet. This will require multiple layers of highlighting so make sure each layer is fully dried before applying another highlight coat! Once all your detail work has been completed, seal down your miniature with a clear spray finish for a shiny finish that will also guard against wear and tear.
- Finally, you can paint the base if desired to complete your project! You may want a color different than what is currently on your miniature or just want something simple for contrast; it will depend entirely on what look you are going for with this piece of art. For painting bases, we recommend using either airbrush (for even coverage) or brushwork where precision is necessary in order to create an effect more similar to traditional acrylic artists paints as opposed to large areas of flat colors which would be achieved when using an airbrush exclusively.
Tips and tricks for painting miniatures with acrylics
When using an airbrush, the paint will need to be thinned. It is important not to oversaturate or over-thin the paint; it should have a consistency similar to milk and still flow smoothly out of the brush. This may take some practice before you get it down pat. Keep in mind that watercolor paints won’t work with an airbrush because they are too runny.
The easiest way I’ve found for painting miniatures with acrylics is by first dipping your brush into water then diping it in your chosen color of paint and start painting right away! The downside about this method however would be that if one layer dries up while another layer does not dry yet, there could be some paint on the surface that would get washed away during the next layer, leaving a streaky effect. This can be avoided by either painting all layers at once or using an acrylic sealant before each new layer of color goes onto your miniature.*
Every airbrush is different and so is every brush you use; what works for me may not work for others. Experiment with different methods to find which one works best for you! In order to thin your paints, it’s recommended that water-based artist colors are thinned with distilled water while oil based counterparts should have their thinner applied in advance as they will dry up if left sitting too long without being used again.*
Other things you can do with painted miniatures (examples)
- Paint a dungeon for an RPG game with the miniatures and use them to play
- Create models of your favorite cars, trucks or buses out of paper and paint them white. They could be used as street signs in dioramas representing different parts of town.
- Use painted miniatures for gardening markers. Put numbers on each one so you can locate plants from season to season without having to pull up their roots every time they bloom again next year. You might also find it easier if some are wearing long sleeves that cover up any identifying marks on their arms or hands (weeding gloves). This is good idea because many types have only annual flowers, which means most come back every spring anyway! But this way, you won’t have to remember which one it was!
- Use them as Christmas decorations on the tree. They can be hung from branches or attached with a wire hanger dipped in white glue (so they don’t fall off). Or, if your miniature is made of metal and doesn’t break when bent, hang them like small lanterns at intervals along an outdoor line strung between two trees. But keep watch so no animals try to eat their material before winter’s over!
- Build models of buildings out of clay or papier mache for architectural renderings that are more detailed than scale drawings could ever achieve. You might even want to paint these indoors using acrylic paints mixed with water because some types contain lead and shouldn’t be used for food preparation or near children.
- Use as game pieces in any board games that require miniatures, such as Dungeons and Dragons, Warhammer 40K or Settlers of Catan. You can also cut tiny holes into the bottom edges of some to add a string so they will hang from tree branches like decorations at Christmas time (or Halloween is). This better than using napkins because there are no strings dangling all over your table afterwards! There’s usually another color on one side too which means you’ll never put them back in with their opponents again by mistake when setting up a new game either.
The best part about painting miniatures with acrylics is that it doesn’t have to take long if you thin your paint for an airbrush. You can even use the color straight out of the tube if you’re using a low-flow orifice tip (available from most art supply stores). And it’s still inexpensive when compared to buying and painting them on a computer screen!